MBOX is a popular format used by various applications to save their email messages. If you have an MBOX file containing your emails and want to import MBOX into Gmail account, you’re in the right place.

There is no native backup tool for Google Workspace to keep the data safe from loss. A lot of small businesses majorly download Google Drive on their local system and update it when there has been a major occurrence.
However, the same is not the case with Gmail. It is possible to export MBOX files, but for users to import MBOX in Gmail, it is not possible.
Fortunately, there is an add-on in Mozilla Thunderbird which you can use for the process. It is going to be a complex process and will have a lot of steps, but we are going to explain it.
You can import any type of MBOX files with or without extensions into Gmail by following a few steps. This method is also feasible, if you are planning to transfer data from Thunderbird to Gmail. In this blog post, we will walk you through a step-by-step guide on how to import MBOX files into your Gmail account.
Why Import MBOX Files to Gmail? What Are the Reasons to Make the Transfer?
Gmail, without any doubt, has become a leader in the email niche. Today, we are going to understand how Gmail works with modern-day technologies for free. But before that, what is an MBOX file and what are the email clients that support it?
What is MBOX?
MBOX is a popular format which people use to store their email messages. There is a collection of emails that these files store and various email clients use it very commonly. The emails in the MBOX files consist of a single, long-text file, where every email starts using the word “From.”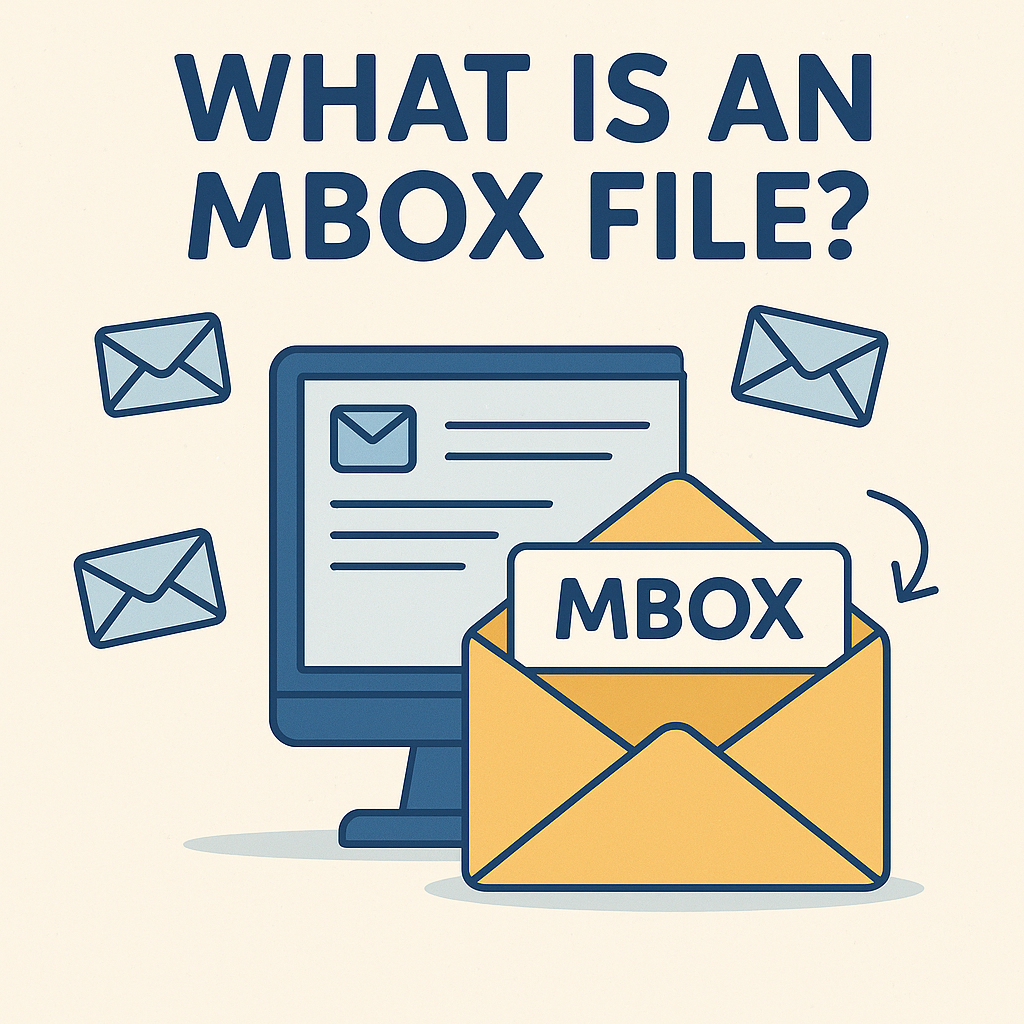
How do MBOX Files Work?
These files store emails in a plain text format. Every email is saved in an order with having access to headers and content via basic text manipulation. Because of this, the MBOX files are easy for cross-platform export and import.
Common Uses for MBOX Files
More than often, MBOX files are used to archive emails. These files are ideal for exporting large email data from one platform to another. This migration also ensures that there is no data loss during the process. The email programs that support MBOX format include:
- Mozilla Thunderbird
- Mac/Apple Mail
- SeaMonkey
- IncrediMail
- Entourage
- Sylpheed
- Eudora
- Spicebird
- Opera Mail
- PocoMail
What Are the Reasons to Transfer MBOX Files to Gmail?
Let’s now take a look at the features of Gmail that make users want to make the switch:
- Even though both Thunderbird and Gmail are free email clients, talking about productivity, Gmail takes the win.
- Your data on Gmail is universally accessible with an internet connection which is not the case with Thunderbird making users move MBOX file to Gmail account.
- A Gmail account is required for various online platforms even to fill an ITR or any government related platform.
- For collaboration and meeting with colleagues, Gmail offers Google Meet, hangout, chat, sheets, and various other options for free.
Other than these factors, there are various other points that can convince users to switch to Gmail. Now, let’s take a quick look at the methods available.
Key Benefits of Gmail Over Desktop-Based Email Clients
- Gmail is Faster: As compared to the desktop based email clients like Thunderbird, Gmail is super fast. Its UI is better and loads the inbox faster. It opens a message quicker and displays new messages instantly. Moreover, it uses less CPU.
- Seamless Integration: Users prefer exporting MBOX files to Gmail account because Gmail offers texting, chatting, and video calling in the same window. There are a few gadgets that allow users to quickly view their calendar and documents. It is easier to manage tasks in the Calendars, and there is a navigational bar. The Undo Send feature allows users to make changes in the email if needed.
- Security and Spam Filtering: The Gmail web incorporates advanced spam filtering techniques offering protection to users from unwanted and malicious emails. There are strong security measures taken by Gmail that include encryption and two-factor authentication to keep the user’s data safe.
Preparing Before Importing MBOX Files to Gmail Account
When preparing to migrate MBOX files from your desktop-email client to Gmail, there are several key points to understand for a smooth process.
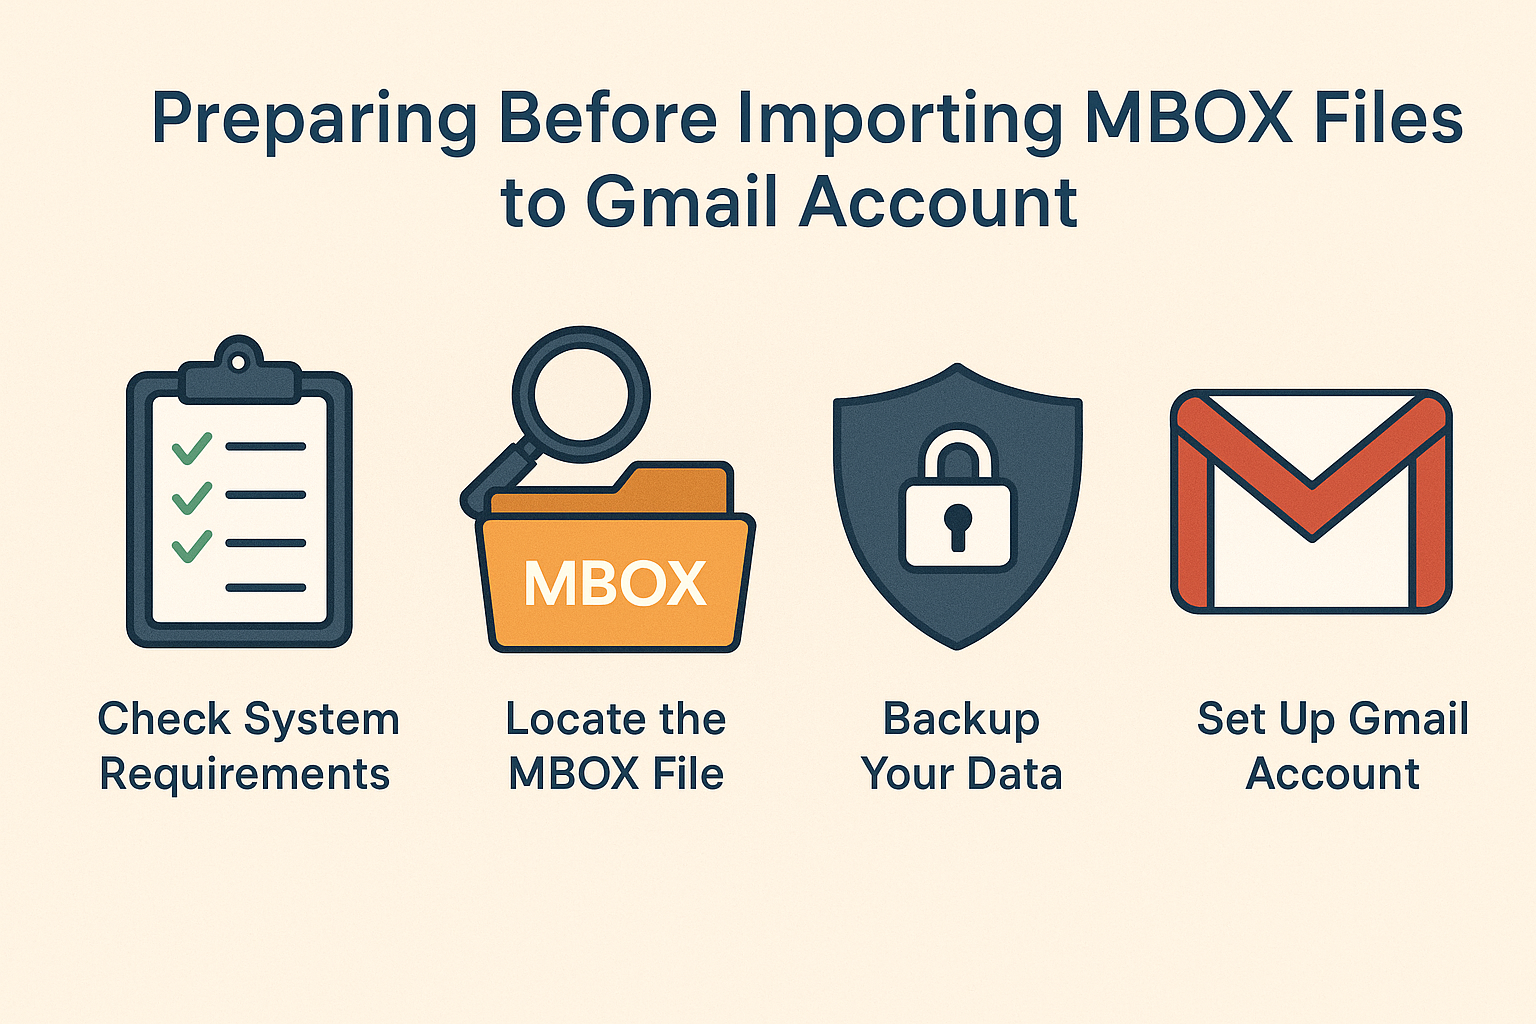
1. Types of MBOX Files
MBOX files, a universal file format supported by multiple email clients. This file format merges multiple email messages in one file and not only includes the text but also the attachments in encryption. There may be a difference in the MBOX variants based on the clients using it. So, it always helps knowing the source of the MBOX file that you want to import to choose the right method.
2. Locating Your MBOX Files
Before you transfer your MBOX files to Gmail, you need to know its location on the computer or external storage. There are various locations such as the profile or data folder of the email platform. Or, any export location you have chosen while taking a backup. It is essential to identify the correct file before importing to avoid irrelevant migration.
3. Data Backup Tips and Caveats
Even if you are sure about the migration process and its success, taking a backup of your data files goes a long way. This helps in avoiding potential data loss situations in numerous situations, Having corrupted or incomplete MBOX files can lead to issues during the import of MBOX files to Gmail. Keeping safe copies of the data will help in case there is a data loss situation.
4. IMAP and App Passwords (Security Changes)
For connecting Gmail with an email client like Thunderbird during MBOX import, IMAP needs to be enabled in Gmail settings. Due to recent security upgrades, if you use two-factor authentication on your Google account, you may need to generate an app-specific password to authorize the email client connection securely. This extra step protects your account during data transfer.
Ensuring File Integrity and Safety Before Importing MBOX Files to Gmail
Before moving MBOX files, it is important for users to maintain their file integrity and safety. This helps in successful and accurate migration. Large MBOX files can cause corruption, interrupting the process or lead to data loss. To mitigate these risks, here are a few things to follow:
- Split Large Files: If you have large MBOX files, the suggestion is to split them into smaller parts. Doing so will reduce the chances of errors during the transfer and make the process manageable.
- Verify File Integrity: Verify your data files to ensure that they are not altered or corrupted before and after transferring the MBOX files to Gmail. Using the checksum or hash tools can help with ensuring the completeness of the files and its authenticity.
- Handle Corruption Carefully: MBOX files, while robust, can become corrupted due to improper handling, software bugs, or storage issues. If corruption occurs, specialized repair tools are recommended over manual fixes, as manual attempts can risk further data loss.
Methods for Moving MBOX to Gmail Account for Ease of Access
Users can follow one quick method to move their files, however, converting the files might be needed to easily access their data. For converting the files, you can either follow the manual method, or quickly export bulk files to Gmail support format. With the help of Magus Tools MBOX converter tool, you can easily transfer the files to the desired format and import them. Let’s start the process for migrating MBOX files to Gmail.
The available techniques include migrating the data via Thunderbird, Automated Tools, as well as Google. Let’s take a look at the first method.
Method 1: Importing MBOX Files to Gmail Via Mozilla Thunderbird Application
Here is the step-by-step guide on how users can utilize the Thunderbird application and make the transfer.
Step 1: Install and Configure Thunderbird
1. Download the newest Thunderbird version.
2. Run it and follow the on-screen directions to finish installing.
3. Start Thunderbird after installation is complete.
Step 2: Set up Gmail Account in Mail Thunderbird
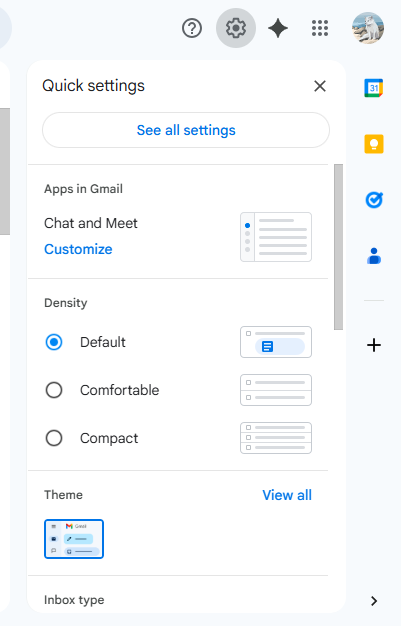
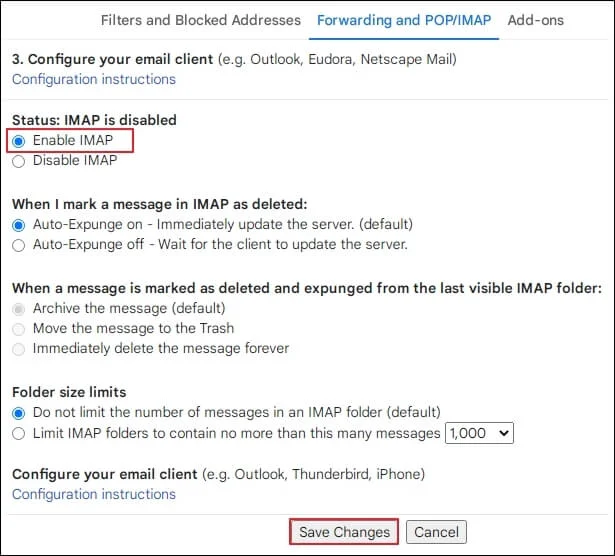
1. Turn on IMAP in your Gmail account: go to Gmail Settings → See all settings.
2. Then, choose the Forwarding and POP/IMAP option and go to Enable IMAP.
3. In Thunderbird, go to Account Settings and press “Add Mail Account.“
4. Enter your Gmail email address and password.
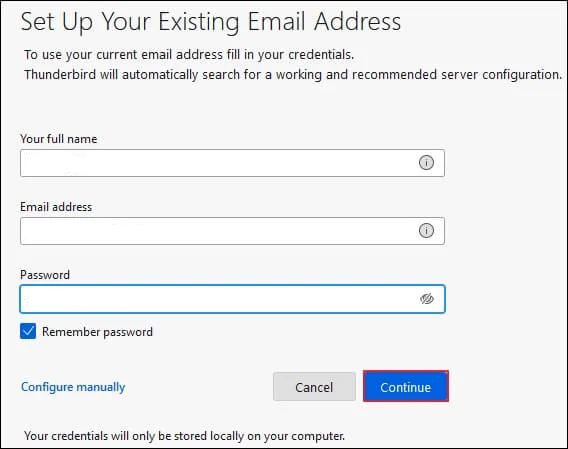
5. If two-factor authentication is enabled on your Google account, generate an app-specific password in your Google Security settings and use that instead of your regular password.
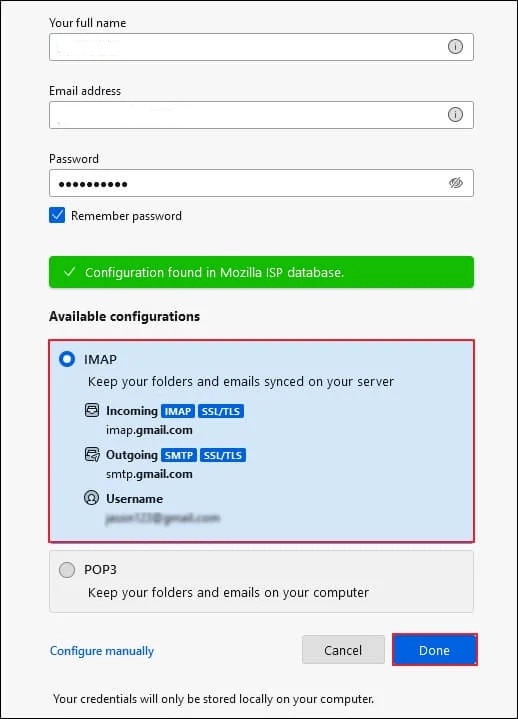
6. Thunderbird uses OAuth2 by default for Gmail, ensuring a secure login.
7. Verify incoming server settings: imap.gmail.com (port 993, SSL/TLS).
8. Verify outgoing server settings: smtp.gmail.com (port 465, SSL/TLS).
Step 3: Install “ImportExportTools NG” Add-on
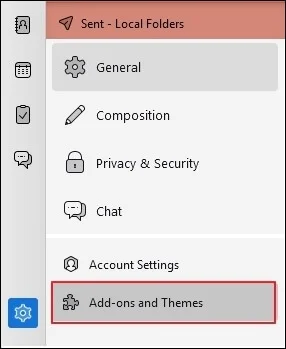
1. In Thunderbird, go to the menu icon and choose Add-ons and Themes.
2. Look for ImportExportTools NG.
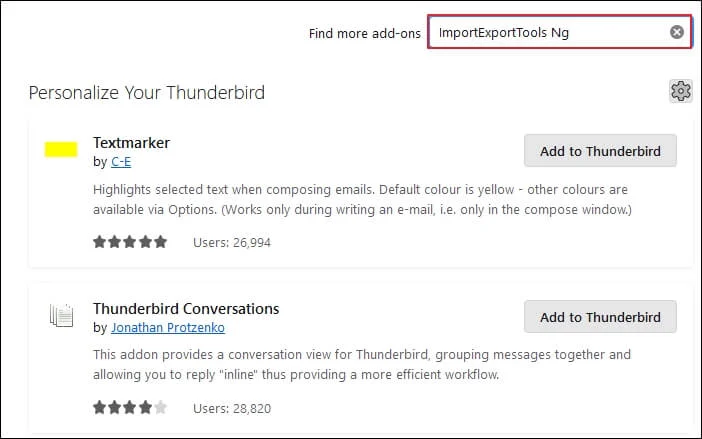
3. Hit Install to install the extension to Thunderbird.
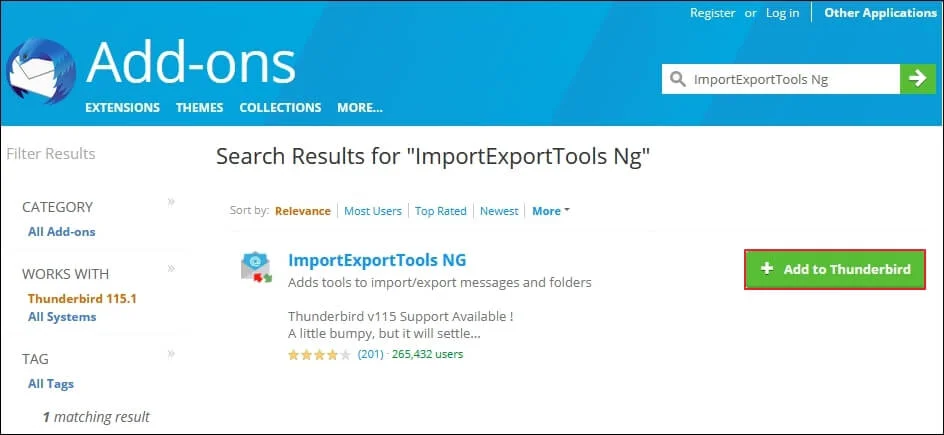
4. Restart Thunderbird to enable the add-on.
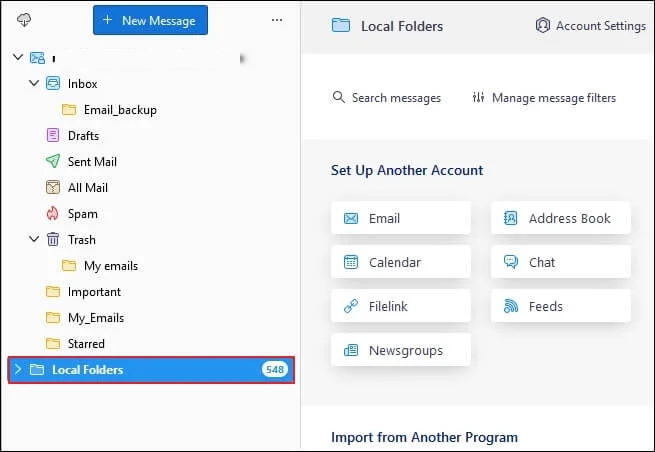
Step 4: Import MBOX File into Thunderbird
1. Right-click Local Folders in Thunderbird’s folder pane.
2. Go to ImportExportTools NG → Import Mbox File.
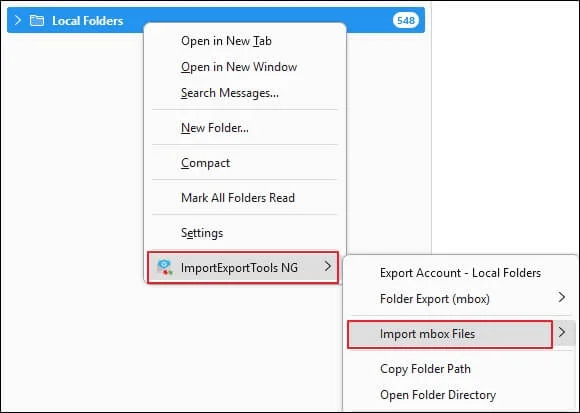
3. Select the option Import directly one or more MBOX files.
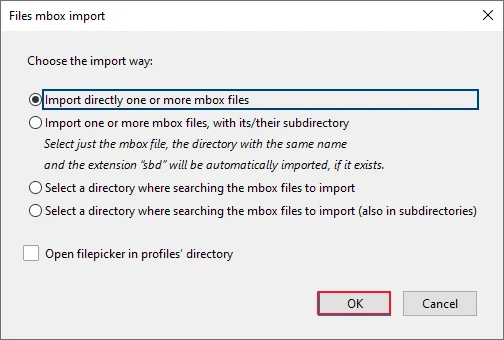
4. Go to your computer and find the MBOX file(s) you want to import, choose them, and click Open.
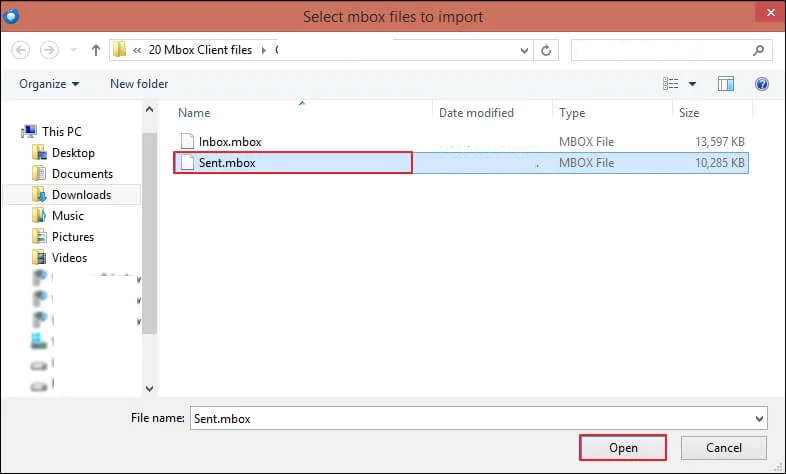
5. Begin the importing process and wait till it completes.
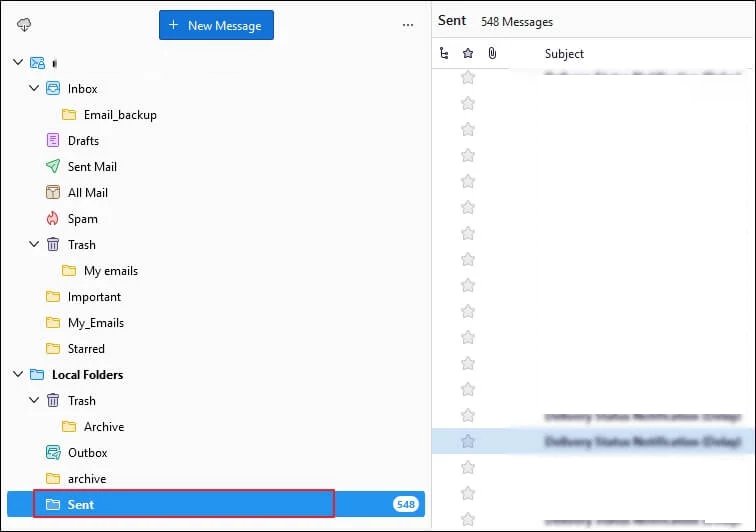
6. Check the imported emails within Thunderbird’s Local Folders.
Step 5: Transfer Emails from Thunderbird to Gmail
1. Choose the imported emails or folders in Thunderbird’s Local Folders.
2. Drag and drop the chosen emails/folders to your Gmail account folders displayed in Thunderbird.
3. Or right-click and select Copy To or Move To and then the destination Gmail folder.
4. Wait for Thunderbird to sync and upload the mail to Gmail through IMAP.
Troubleshooting Tips for Using Thunderbird to Export MBOX Files to Gmail
- Use Updated Thunderbird and Add-On: Make sure you’re using the most recent version of Thunderbird as well as an updated version of the ImportExportTools NG add-on. You may run into compatibility issues if either is out of date, which would prevent you from importing your MBOX files.
- Run Thunderbird in Safe Mode: Launch Thunderbird in Safe Mode to deactivate any conflicting extensions or settings that may block MBOX import.
- Import to Local Folders Only: The import option does not work for IMAP folders; for MBOX files, right-click the Local Folders icon and begin the importing process there; afterwards, you will be able to sort your emails into Gmail folders.
- Check Your Permissions On MBOX Files: Check to be sure that your MBOX files have read/write permissions set correctly (if applicable) and are not open in any other program when you attempt to import.
- Do Not Import Corrupted Files: Ensure that you will only be importing valid and non-corrupted MBOX files. You can run particular integrity checks on these files and/or use repair programs if you suspect corruption has taken place.
- Restart Thunderbird: If the import option is greyed out or missing after installing the add-on or just created the folders to receive the new mail, consider restarting Thunderbird.
- Create a New Thunderbird Profile: If you continue experiencing issues with importing/exporting, you can always create a new Thunderbird profile, and reinstall the ImportExportTools NG add-on in the new profile. Sometimes profile corruption is the cause of these ongoing problems.
- Use Meaningful Names for Files: Try to give your MBOX files a simple name like “Inbox”. Keep the folder designations to a minimum. Don’t give them designations like “.mbox” because that may confuse Thunderbird when it attempts to read it.
- Use Professional Tools: If you are importing a large number of MBOX files or a single MBOX file that is large, or if you are continuing to have memory issues with your previous attempts to import MBOX files.
Method 2: Import MBOX to Gmail Without Using Thunderbird
Gmail’s Import Mail and Contacts feature allows users to export all the data without having Mozilla Thunderbird. Here are the steps:
1. Sign in to your Gmail account.
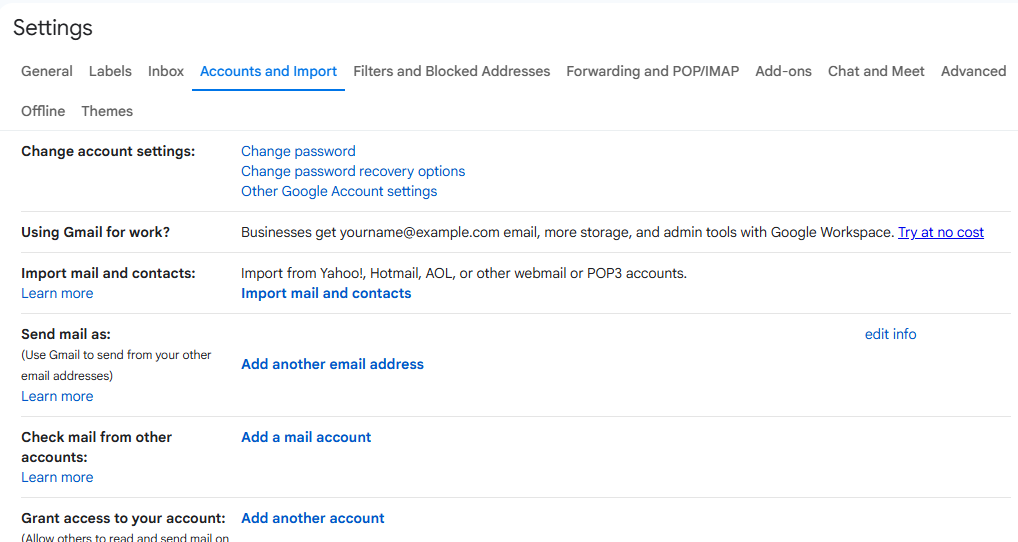
2. Click on the Settings button on the right side of the window and choose See All Settings.
3. Now, hit the Accounts and Import tab to move further.
4. After that, choose the Import Mail and Contacts option under the Import Mail and Contacts section.
5. Enter the email address that you want to import MBOX files to Gmail account in the pop-up window. Hit Continue.
6. Provide the Password for the email and hit proceed.
7. Select the data that you want to import such as Emails and Contacts.
8. Hit Import.
Limitations of the Manual Methods to Import MBOX to Gmail
There are some significant drawbacks to manual MBOX migration to Gmail:
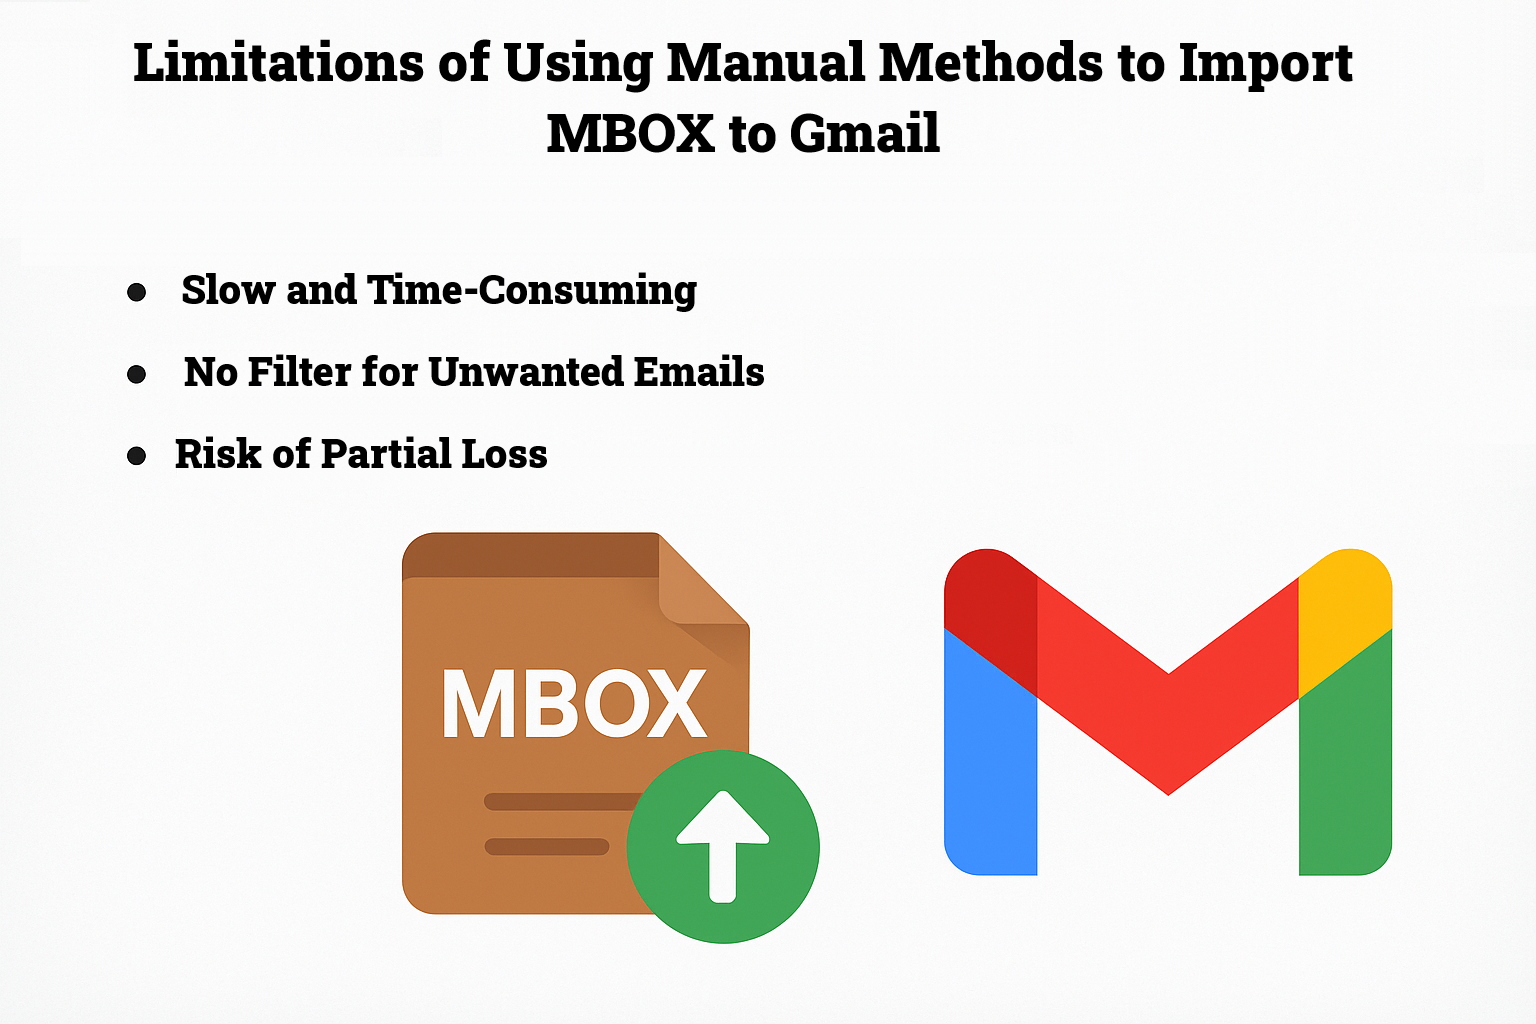
- Slow and Time-Consuming: This can be a very slow way to import MBOX files and can take several hours, sometimes even days, for large files or multiple mailboxes.
- No Filter for Unwanted Emails: You cannot filter incoming mails using manual approaches. All emails contained in the MBOX files will be imported into Gmail, resulting in a lot of unwanted or irrelevant emails in Gmail, which adds more clutter.
- Limited Scalability and Batch Imports: You typically would only be importing one MBOX file or one folder at a time. You can’t import multiple MBOX files or folders in Gmail. Only one file or folder at a time; therefore, bulk (or batch) imports are not available or not easy to do, and getting a lot of accounts migrated or large archive sets migrated is almost impossible with a manual option.
- Technical Knowledge Required: The manual import process requires varying amounts of technical knowledge from users, some or all of the issues related to configuring Thunderbird, You also need to enable IMAP and app passwords, and when you are importing and exporting you will have to deal with Thunderbird’s import/export tools, which could be confusing for a non-technical person.
- Risk of Partial Loss: The manual import process is also not without risks. It is technically possible for the import to be interrupted, or users configure things incorrectly or are working with an MBOX that is corrupted, which can lead to loss of data or emails losing their formatting. Similar to the loss of data, you may not be automatically syncing updates with the imported emails with new associated updates; and, you may just be importing the same emails again if you wanted to sync those updates.
- Reliance on Email Clients: The manual import process typically relies on Thunderbird and also add-ons for use in Thunderbird such as ImportExportTools.
Method 3: Convert MBOX to a Gmail-Compatible Format
Gmail natively supports importing certain file formats, such as PST or CSV, instead of MBOX. If your MBOX file is not compatible with Gmail, you may need to convert MBOX to Outlook PST or CSV or to a compatible format. There are third-party tools available that can assist with this conversion. Alternatively, you can skip this step if your MBOX file is already compatible with Gmail. If not, use the software.
Step 1: Convert MBOX Files Using Top MBOX Conversion Tool
1. Install and run the MBOX to PST converter.
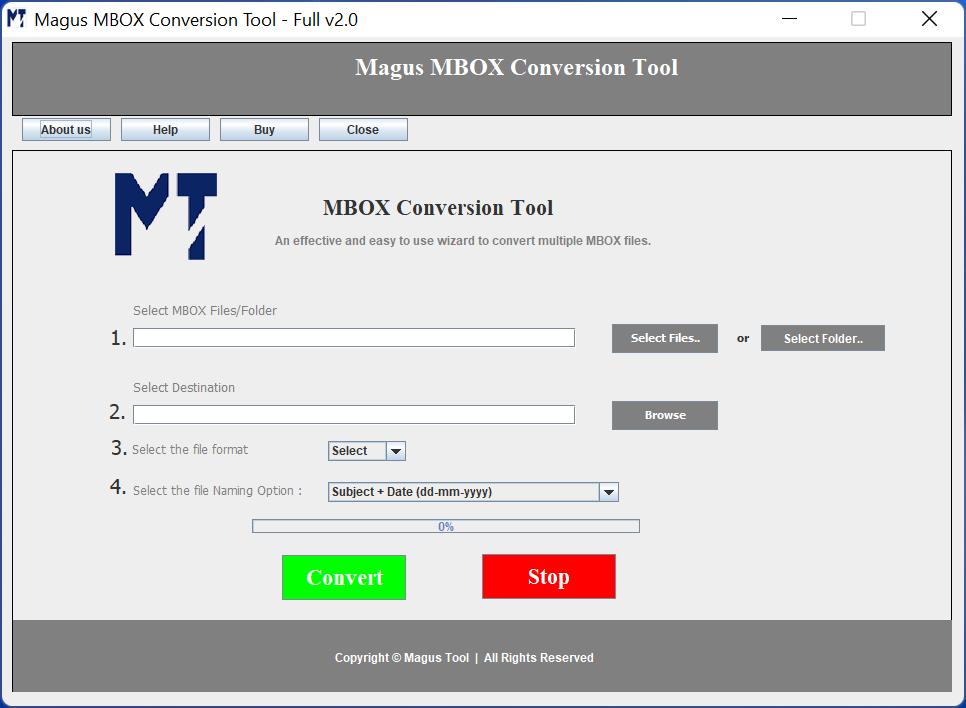
2. Choose the files via Select File or Folder option.
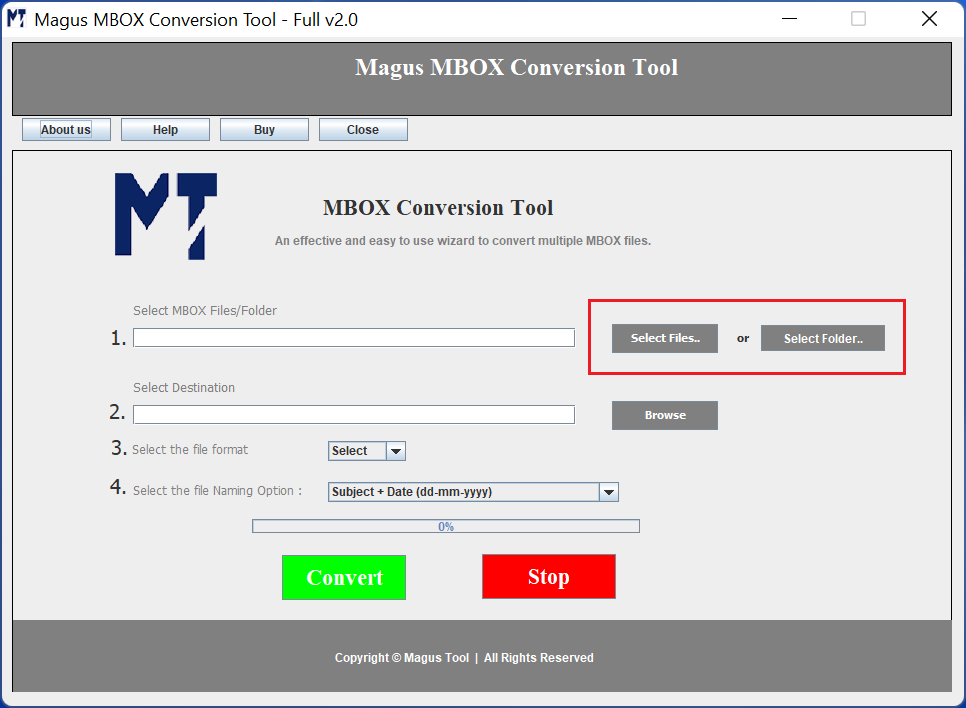
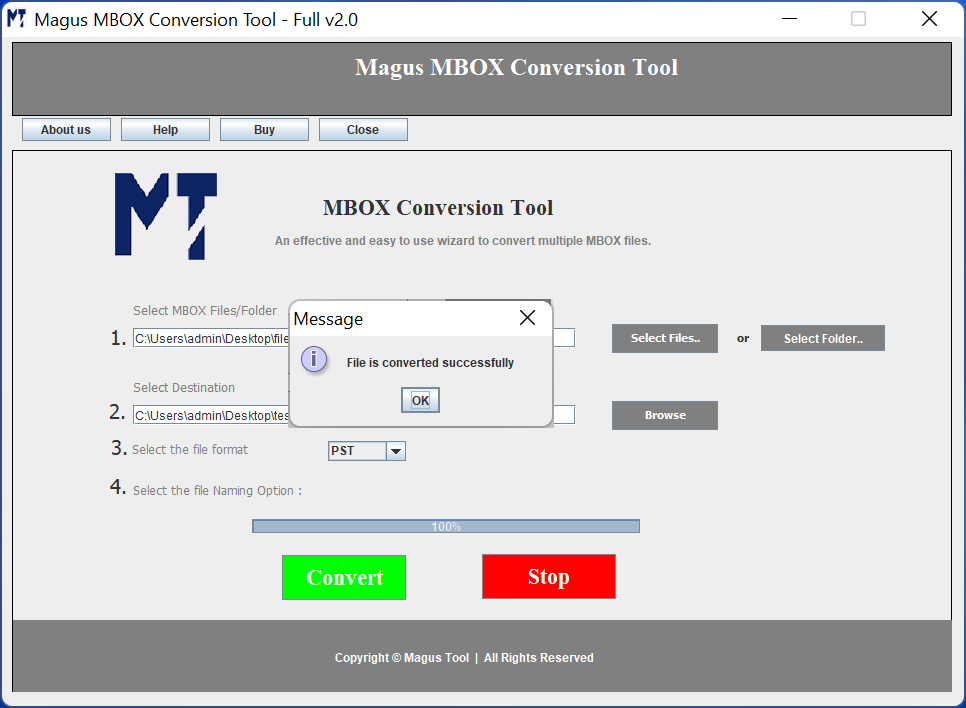
3. Set the destination path via Browse button. and choose the file format as PST.
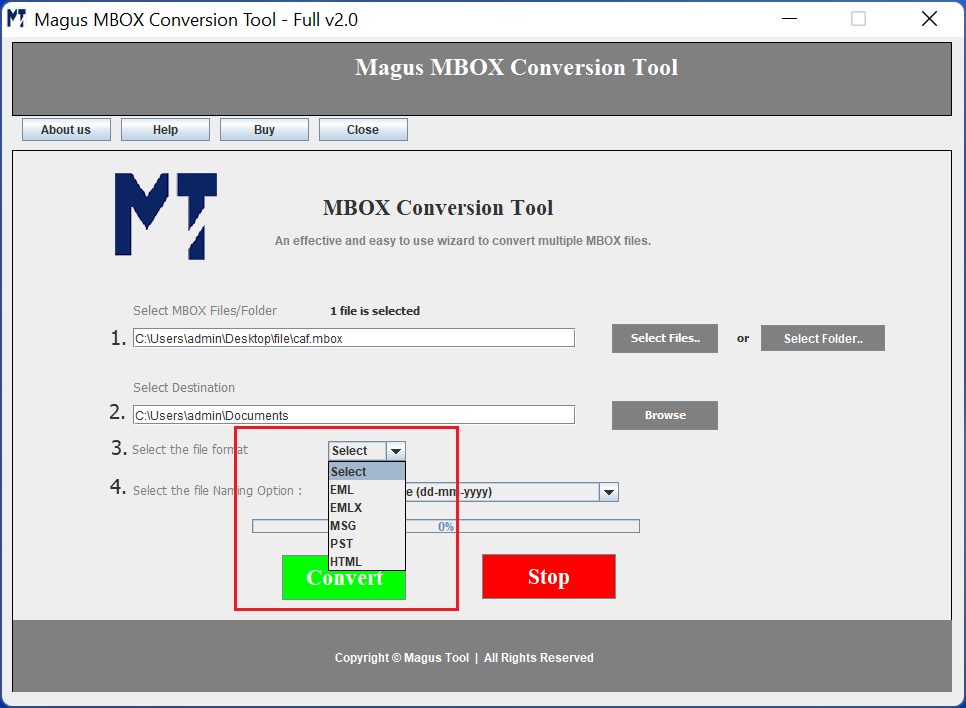
4. Hit Convert to make the transfer.
Step 2: Log in to Your Gmail Account to Move MBOX Files to Gmail
Using your preferred web browser, navigate to the Gmail website (https://mail.google.com) and log in to your Gmail account using your credentials.
Step 3: Access Gmail Settings
Once you’re logged in to your Gmail account, locate the gear icon in the top-right corner of the Gmail interface. Click on the gear icon, and from the dropdown menu, select “Settings.”
id=”z23″Step 4: Go to the “Accounts and Import” Tab
In the Gmail Settings page, click on the “Accounts and Import” tab. This section provides options for managing email accounts and importing MBOX into your Gmail account.
Step 5: Import Emails and Contacts
Under the “Accounts and Import” tab, locate the “Import mail and contacts” section. Here, you’ll find the option to import emails and contacts from other accounts. Click on the “Import mail and contacts” link.
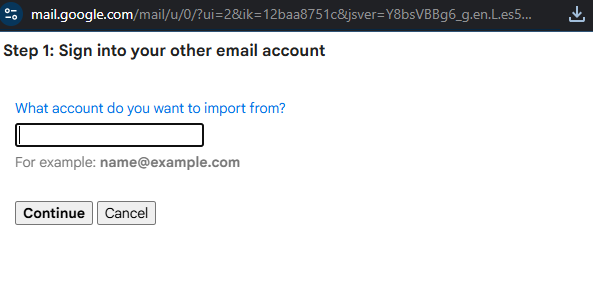
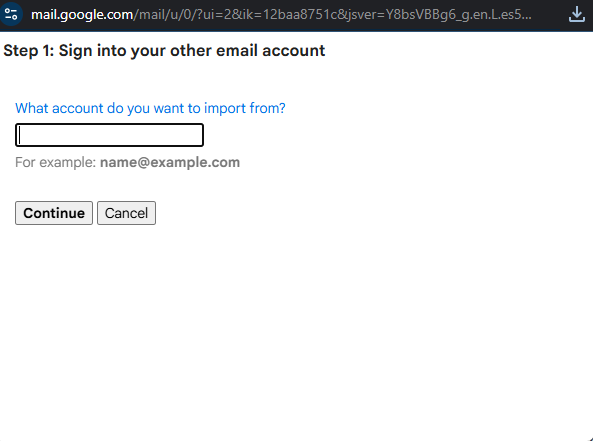
Step 6: Enter MBOX File Details to Migrate MBOX Files into Gmail
In the “Import mail and contacts” window, a popup will appear. Enter the email address associated with the MBOX file you want to import. Click on the “Continue” button.
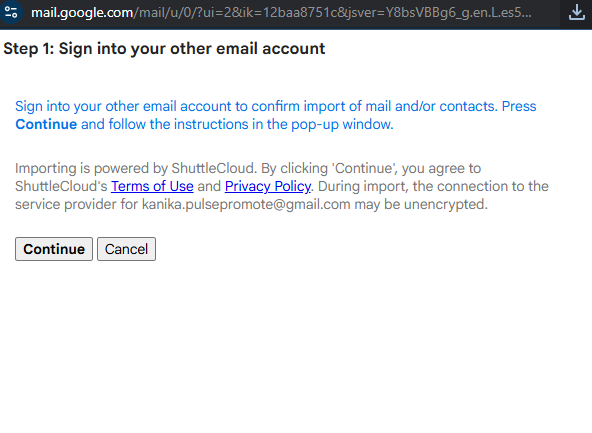
Step 7: Grant Permission and Authenticate
Gmail will request permission to access your other email account. Follow the on-screen instructions to authenticate and grant permission for Gmail to import emails and contacts from your MBOX file.
Step 8: Configure Import Options
Next, you’ll be presented with options to customize the process to import MBOX files into Gmail. Choose the desired options, such as importing all existing emails or selecting a specific time range. You can also choose to import contacts if applicable. Once you’ve configured the options, click on the “Start import” button.
Step 9: Monitor Import Progress
Gmail will begin importing your emails and contacts from the MBOX file. Depending on the size of the MBOX file and the number of items to be imported, this process may take some time. You can monitor the progress in the “Accounts and Import” section of Gmail Settings.
Step 10: Verify Imported Emails and Contacts After Moving MBOX to Gmail
Once the import process is complete, you can verify that the emails and contacts from your MBOX file are now available in your Gmail account. Check the respective folders and contacts list to ensure that the import was successful.
Troubleshooting Common Issues Arised by Migrating MBOX Files to Gmail
Following are the basic issues that you can troubleshoot:
- Verification of MBOX file integrity via checking for corruption, file size, and type.
- Gmail configuration via enabling IMAP and checking for third-party app passwords.
- Troubleshooting manual import by installing Thunderbird, using ImpoortExportTools NG, correct folder mapping, and syncing.
- Using general troubleshooting steps such as Restarting PC, checking for updates, consulting documentation.
What Are the Pros and Cons of Importing MBOX Files to Gmail Via the Tool?
The use of third-party tools for importing MBOX files to Gmail has several pros and cons, which can help you decide whether to use such software versus manual methods like Thunderbird. Based on current tool features and user considerations, here is a balanced overview:
Pros of MBOX to Gmail Conversion Tool
- Efficiency and Speed: The conversion software allows users to import large MBOX files or multiple data files quickly. It saves important moments as compared to the manual methods.
- Preservation of Data Integrity: With the help of this tool ensures that all the metaproperties are kept the same. The folder structures are also preserved during the migration.
- User-Friendly Interfaces: During the migration of MBOX files to Gmail, users can easily transfer emails in batches and bulk without having any technical knowledge.
- Support for Multiple Output Formats: Besides migrating emails to Gmail format, the software also allows conversion to PST, MBOX, HTML, and others, offering flexibility for other migration or archival needs.
Cons of Conversion Software for MBOX to Gmail
- Cost: The software is quite reliable and fully featured, however, it is paid. It requires upfront purchase or subscription fees, unlike manual methods which are free.
- Potential for Software Bugs or Failures: Even though the tools to migrate MBOX to Gmail account are generally reliable, the tool can have compatibility issues sometimes.
- Limited Trial Versions: Free versions or trials often limit the number of emails or folders you can migrate, so full evaluation requires purchase.
Common Challenges of Migrating MBOX Files to Gmail Account and Their Solutions
|
Action |
Challenge |
Solution |
|
1. Gmail Doesn’t Have Direct MBOX Import Support |
Gmail lacks an in-built function to directly import MBOX files, necessitating the use of an intermediate client or tool. |
Utilize email clients such as Mozilla Thunderbird set up with Gmail IMAP to import MBOX or select a commercial MBOX to Gmail import utility capable of direct upload using secure OAuth authentication. |
|
2. Manual Import Using Thunderbird Complexity |
Manual import via Thunderbird is a multi-step process: setting up Gmail IMAP, adding add-ons such as ImportExportTools NG, importing MBOX, and finally transferring emails to Gmail folders. This takes time and some technical expertise. |
Use detailed step-by-step instructions to set up Thunderbird correctly, including enabling application-specific passwords if two-factor authentication has been activated. Alternatively, specialized automated tools make it much easier with minimal user intervention. |
|
3. Huge or Damaged MBOX Files Failing to Import |
Huge MBOX files might not be importing in full or crashing the import process. The same issue may arise with damaged files resulting in data loss or partial transfer. |
Huge MBOX files might not be importing in full or crashing the import process. The same issue may arise with damaged files resulting in data loss or partial transfer. |
|
4. Email Metadata and Folder Hierarchy Loss |
Certain manual techniques jeopardize losing email metadata (dates, from/to info, read/unread status) and folder structures while migrating. |
Utilize tools that are famous for maintaining full metadata and folder hierarchy. Thunderbird (with the right add-ons) and third-party converters both allow labels, attachments, and email properties to be preserved during the migration. |
|
5. Security and Authentication Challenges |
New Gmail security enhancements (after May 2022) demand OAuth2 authentication or app passwords for third-party applications, making setup configurations more difficult. |
Create app-specific passwords when two-factor authentication is activated, or utilize tools that are OAuth2-supported for easy and secure Gmail access. Adhere to Gmail’s security best practices to safely authorize external apps. |
|
6. Import Speed and Scalability Limitations |
Slow imports are performed manually and usually support one MBOX file at a time, making bulk migration cumbersome. |
Use third-party software with batch import and filtering capabilities to speed up migration times and provide selective email migrations per date, sender, or keywords. |
|
7. Risk of User Errors and Data Loss |
Misconfigurations or disrupted imports may lead to selective imports or Gmail mailbox corruption. |
Adhere to procedural instructions carefully, back up MBOX data prior to importing, and use professional software with in-built error checking and recovery capabilities to reduce risk. |
Wrapping Up on How to Import MBOX Files into Thunderbird
Importing MBOX files into your Gmail account allows you to consolidate your email data and have it readily accessible in one place. By following the step-by-step guide outlined in this blog post, you can smoothly import your MBOX files into Gmail and have all your emails and contacts conveniently organized within your Gmail account. Enjoy the benefits of centralized email management and enhanced productivity!
Remember, the availability and functionality of certain import options may vary based on the specific features and settings of your Gmail account.

Emily
I'm a content writer with a solid understanding of software and technical topics, which allows me to break down complex concepts into clear, engaging content. I enjoy creating articles, guides and documentation that connect with both tech-savvy readers and those new to the subject