Creating new PST file in MS Outlook is a common practice. It is mainly done by Outlook users to manage their archived data. Or, it is highly used by Forensicator for legal requirements. That is why Microsoft makes sure not to change this feature in any of the newer versions of MS Outlook.

Here I am explaining you 2 processes which helps you to create PST file to archive your data
Method 1
- To begin with, launch MS Outlook in your machine
- Next, click on New Items and a drop down menu will appear
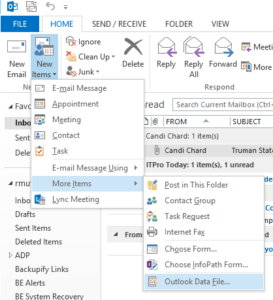
- From the list, select “More Items” then go to “Outlook Data File…”
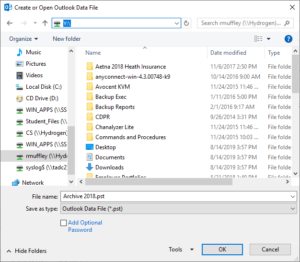
- Now, select a location to save the .pst file on your machine and type in a desirable name for your PST file
- Leave the Save as type as Outlook Data File (*.pst)
- The new PST file will appear on the left hand column of the Outlook screen.
Once the PST file is created, you can make any new folder in it to store your older emails.
Method 2:
If the above method does not work for you then try another method to create PST file in MS Outlook and know how to create PST file if you are using MS Outlook 2016.
Bottom Line
In case of Exchange server, the users mainly want to create PST files from there MS Outlook profile to backup their older data but when they have to export the entire account data then create PST files won’t be a solution. Here, OST to PST conversion tool is required.
This wizard is created just to help MS Exchange users to export their local OST files into PST file format keeping the folder structure and other associated data intact. In this, you can have all your MS Outlook data backed up in a PST file at once.
Conclusion
MS Outlook is widely used and a lot of users prefer not to switch to any other emailing application because of its ease and compatibility. Thus, we try our best to make available all the little solutions required to keep your work unhampered; which resultantly increase productivity.

Emily
I'm a content writer with a solid understanding of software and technical topics, which allows me to break down complex concepts into clear, engaging content. I enjoy creating articles, guides and documentation that connect with both tech-savvy readers and those new to the subject